Gutter Downpipe Repair
Gutter downpipes play a vital function in any gutter system. They efficiently transport water out of the guttering and to the ground. They can shield a building from water damage and require regular inspection, maintenance and cleaning to ensure their proper operation.
Roof plumbers should repair a damaged downpipe as soon as they can. Here are some useful tips to guide your gutter downpipe repair:
Remove the old Downspout
Gutter downpipes play a critical function in directing rainwater away from the foundation of your home, thereby protecting it from deterioration and preventing water damage. Sometimes, they become blocked or damaged, which can lead to water pooling at the foundation of your structure or causing water leaks.
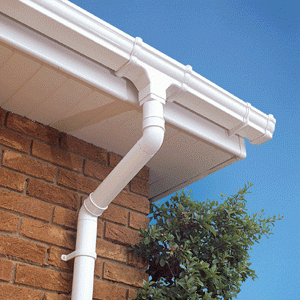
Gutter downspouts are curving at both the top and bottom to capture and disperse rainwater. They also have a special hole that connects them to your gutter system. These holes are usually sealed to prevent leaks or a buildup that could block rainwater from flowing through the downpipe.
The downpipes are connected to the guttering system using hangers, typically screws that hold them to the wall of your home or building. You can take out these screws, but be careful not to remove the downpipe from the guttering system because this can cause additional damage.
When the downpipe is removed from the guttering system, you can take it off your roof and put it aside for cleaning or disposal. You may need to replace your downpipes if they are old or in bad condition. There is a variety of sizes as well as materials and finishes to select from for your gutter system. Choosing the right downpipe size is essential because it guarantees that your gutter system is able to effectively handle the volume of rain without clogging or overflowing.
The use of gutter extensions is a different way to improve your downpipe performance. This is an easy DIY project that will keep water from accumulating close to the base of your home and also protect your home from water damage.
Downpipe bends can be used to create "swan necks" for your downpipe. This can redirect the flow of water and prevent it from draining near your home. They can be made of plastic or metal and you should ensure that they're sized appropriately to fit your guttering system and weather conditions.
The internal stopend is set in the middle of the running outlet of a downpipe in order to stop the gutter from bursting at the end. This is a good opportunity to check if the internal stopend is blocked by dirt or debris.
Clean the Downspout
The downspout plays a crucial part in your gutter system. It should be in good working order to ensure that water flows smoothly. If the downspout is clogged it is likely to lead to your gutters overflowing. A small amount of gutter overflow isn't an issue but a complete blockage of the downspout can be a real problem.
You'll have to climb up your ladder if your downspout has been blocked. Before doing that however, you'll be required to ensure that your ladder is set up safely. Have your assistant (preferably someone who is able to exert pressure) to hold the ladder while you climb it. Then, ask them to provide you with a garden hose. Put the end of the hose into the mouth of the downspout and turn it on. The water flow will force the blockage out. If it doesn't, you might require to increase the water pressure a bit or try another technique.
The next step is to make use of an air blower or a wet-dry vac to clear the accumulated debris inside the downspout. You could also employ a drain auger dislodge the obstruction if you have one in your garage. If that doesn't work, you can try sending a stronger stream of water down the downspout using the power washer.
If the obstruction doesn't appear to be too serious, you can attempt to get it out by hand. Start from the top of the downspout and work your way towards the bottom. Be aware that the downspout in your gutter could be blocked with muck from years of decomposing leaves, so you might get covered in muck as you try to clean it. After the obstruction has been removed, your downspout will be clean and water should flow freely from it to the ground. If not, you'll need to clean it once more before your gutter system can drain properly. You should do this every few months to avoid clogs.
Replace the Downspout
The downspout is a conduit which carries rainwater from your gutters to the ground. Downspouts may empty into a rain barrel, a garden feature, or into an underground drain pipe that leads to an septic or storm sewer tank. No matter where they empty into, they must divert the water away from the house to prevent foundation or basement damage and decay.
Gutter downpipes are available in variety of sizes and types of materials. They are made to match the length and size of gutters on the roof and local climate conditions. Downpipes should be regularly checked and cleared of debris to avoid clogs. Look for cracks and broken sections within the downpipes. These are indicators of serious issues that require professional attention.
A clogged drainpipe could cause the gutters to slump or even collapse. To clean a downspout, reach the top of it with a ladder, exercising extreme care and ensuring that an assistant hold the ladder securely. If you spot an obstruction in the downspout area, use a hose and clean it to allow it to drain. If it's completely blocked, you will need to remove and replace the downspout.
Downspouts are connected to gutters by a drop outlet (also known as a downspout outlet). The outlet is a tiny piece of hardware that allows the downspouts to extend out from the gutter. If the gutter doesn't already have a downspout, drill a small hole. Then, coat the outside of a new downspout outlet with gutter sealant, and fit it into the hole that you drilled in the gutter.
When you are reattaching the downspout back to the gutter Use sheet screws made of steel instead of nails. It is also recommended to install brackets that work with your gutter system. Metal gutters, for example, use straps to attach downpipes to walls. vinyl gutters come with metal brackets that attach to the sides of the gutters.
Start with a short section of gutter that connects to the downspout. It should be the exact same length as the elbow attached to the downspout. Each downspout has a section that is squeezed, or "crimped," on one end. Use a gutter crimper to crimp the edges so that it is flush with the other elbow.
Repair the Downspout
Gutter downpipes are exposed to the elements and over time will wear out, especially where they join with other gutter components. The joints may become loose or split, which could cause leaks by dragging dirt into the seals. This issue is easy to fix using the proper tools and know-how. Regularly inspecting your gutters and downpipes can help avoid problems like blockages, standing water and leaks.
The downpipe is the final part of a guttering system that redirects rainwater to an outlet or soak well drainage system to avoid flooding. It is crucial to connect your downpipe to your stormwater and soak it thoroughly to ensure the stormwater doesn't flow into other parts of your garden or house.
If your downpipe is leaking it's likely that the cap at the end cap has fallen off or has been worn away. This issue can be resolved by applying Gutter Sealant on the inside of your downpipe, where it meets the gutter. Wearing gloves made of latex, then press the sealant into place.
Another reason why downpipes can leak is if the gutter is not pitched correctly. The gutter might need to be removed and the downpipe replaced, before the gutter is mounted again. This is easy enough with a ladder but be sure to exercise extreme caution when working at heights and have someone to hold the ladder's bottom.
Other components of the guttering can also leak, like the end caps or elbows. If this happens, a tiny hole in the guttering system can be repaired by using gutter sealant. Apply the sealant to the joint using your fingers and press it into place while wearing gloves made of latex.
Leaks around the joints of a downpipe is often caused by paint or rust rubs off. This can be corrected by scraping away the old paint or rust and applying gutter sealant to the area that must be sealed.
kingston Guttering Specialist to ensure the gutter sealant is completely dried and is not contaminated by other substances like dust or sand.


 icons at the top right corner of the subsection.